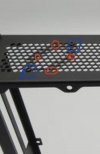
Stalled Slim console-style case from Velkase. Looking for tester and reader feedback.
- Thread starter VELKASE Michael
- Start date
You are using an out of date browser. It may not display this or other websites correctly.
You should upgrade or use an alternative browser.
You should upgrade or use an alternative browser.
You can also swap the panel with the USB cutouts onto the opposite side of the case, where the graphics card is, but that will reduce clearance for it. It’s better to install the ports on the PSU side and offset the PSU with the included standoffs.Is the only way to mount the 2x usb 3.0 ports to the case through the PSU mount? It think if I do this I won’t be able to lay it flat because it will cover the vent for my psu unit. Corsair sf750.
a few more questions.


- How do I secure the power button to the front of the case? It looks like it might screw into something but idk what? (Figured it out, gotta unscrew the nut first, which I thought was part of the button, and put the power button through the hole, pull the wires through the nut and tighten it to the case, which is a lot easier if the front panel isn’t already on)
- There is a stand and feet, how am I suppose to attach those? (Think I figured this out, the silver hex things I had left over sit between the feet and the bottoms of the case and the screw goes into the bottom of the foot and screws into the silver part, then do the same from the inside of the case, also significantly easier with the bottom panel not attached.)
- Am I going to have a problem with my SSD on the back of the mobo in this case?
- What are all these extra parts I have left over? Should I have used them? What are they for? (See first picture). After some tinkering, maybe the silver hexogonal parts help with the feet, the black silicon things are feet pads that probably need to be cut out to fit the stand feet (not sure which to use for which stand), the little silver bar is used for one of the side plates to screw into, and I still have no idea about those 2x brass bars looking standoffs maybe?!?
- Does the build look right? Are there any obvious issues? This is my first build so I’m being overly cautious.


Last edited:
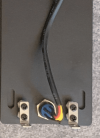
1. The button has a stainless steel hex nut attached to it. It needs to be temporarily removed, then you insert the button through the front panel hole, and secure the nut on the other side. Similar to this:a few more questions.
- How do I secure the power button to the front of the case? It looks like it might screw into something but idk what?
- There is a stand and feet, how am I suppose to attach those?
- Am I going to have a problem with my SSD on the back of the mobo in this case?
- What are all these extra parts I have left over? Should I have used them? What are they for? (See first picture
- Does the build look right? Are there any obvious issues? This is my first build so I’m being overly cautious.
2. These stainless steel brackets need to be attached to the side panel behind the motherboard and the bottom panel, with screws in the corners. If the holes don't align with the side panel holes, flip the bracket because they only match up one way. If you want to use the oval stand, you'll have to make sure that they are space apart the appropriate amount to match the mount spacing on the oval stand.
Then you can use the countersunk screws to attach the bar feet or oval stand.
The larger adhesive rubber feet go on the bar feet and the smaller ones can go on the oval stand.
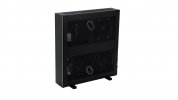
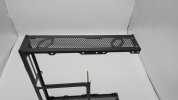
3. There should not be any issue with M.2 SSDs
4. This small stainless steel part goes behind this panel by the motherboard to align with the 3 holes. Add a screw where shown to secure it, and then the side panel can be attached to the other thread hole.

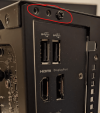
5. The PSU inlet should be screwed down on the outside like this with countersunk screws. The brass standoffs can be used to mount it further out and prevent the hard plastic housing from interfering with the graphics card, but it doesn't look like you need to use those with your graphics card.
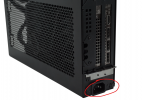
Please let me know if anything is not clear. I understand that it can be confusing with a lack of documentation on this particular design.
2. These stainless steel brackets need to be attached to the side panel behind the motherboard and the bottom panel, with screws in the corners. If the holes don't align with the side panel holes, flip the bracket because they only match up one way. If you want to use the oval stand, you'll have to make sure that they are space apart the appropriate amount to match the mount spacing on the oval stand.
Then you can use the countersunk screws to attach the bar feet or oval stand.
The larger adhesive rubber feet go on the bar feet and the smaller ones can go on the oval stand.
View attachment 2869
Thank you for the response, it was incredibly helpful. However, I dont understand what these side panel steel brackets do or where they connect to?
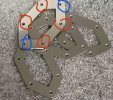
Those brackets just have threaded holes. Unfortunately, I cannot provide image to explain it more clearly at the moment but they can be attached anywhere on the side panel perforation with a pair of M3x0.5 screws diagonally. Its threaded holes are arranged in a way that coincides with the perforation pattern. The bracket goes on the inside of the side panel and gets attached with screws from the outside.Thank you for the response, it was incredibly helpful. However, I dont understand what these side panel steel brackets do or where they connect to?
Then, if you line up the holes of the feet or stand with the remaining threaded holes of the brackets (which by this point are attached to the inside of the side panels), you can screw them down with an additional pair of screws from the outside.
The threaded holes circled in blue are where the bracket gets attached to the side panel, and the red ones are where the feet/stand attach to the bracket.
Attachments
Last edited:
That I understand, I guess i just wanted to know if they were used for anything other than the feet/stand? You put some on the side of your case in the picture and I guess i had not thought about the case being put on its side with feet.Those brackets just have threaded holes. Unfortunately, I cannot provide image to explain it more clearly at the moment but they can be attached anywhere on the side panel perforation with a pair of M3x0.5 screws diagonally. Its threaded holes are arranged in a way that coincides with the perforation pattern. The bracket goes on the inside of the side panel and gets attached with screws from the outside.
Then, if you line up the holes of the feet or stand with the remaining threaded holes of the brackets (which by this point are attached to the inside of the side panels), you can screw them down with an additional pair of screws from the outside.
The threaded holes circled in blue are where the bracket gets attached to the side panel, and the red ones are where the feet/stand attach to the bracket.
They are only used for the feet and stand. Since there are 4 of those brackets, you can install all of them and be able to switch between a horizontal and vertical orientation later without disassembling the case.That I understand, I guess i just wanted to know if they were used for anything other than the feet/stand? You put some on the side of your case in the picture and I guess i had not thought about the case being put on its side with feet.
There is one more leftHave all the prototype units been sold?
There is one more left
Sorry just read that the link doesn't work anymore because so I thought they were already sold out. I'll send you a PM so I can get a Paypal Invoice for that last prototype.
No ETA on release, sorry.I'm assuming they are out now? Any ETA on release was gonna get the Velka 7 rev 3.0 today but somehow stumbled upon this prototype on Reddit.
Any news? Do you still need or want feedback?No ETA on release, sorry.
No, sorry. Changing the status to “stalled” for now.Any news? Do you still need or want feedback?
I know its Abandoned/ Stalled but if you can increase the length of the case by 7mm it would be able to perfectly fit a 5090 FE. It would be the ultimate case. Sadly, I don't use mine anymore since I got the formD T1
Similar threads
- Replies
- 3K
- Views
- 1M
- Replies
- 2
- Views
- 3K
- Replies
- 8
- Views
- 10K
- Replies
- 54
- Views
- 21K
- Replies
- 10
- Views
- 7K

