Prototype THE TINY BOY'S ADVENTURE! - Join me through the wonderful story of a tiny case... of 3.68L

_ONE_

SFF Lingo Aficionado
Original poster
Mar 1, 2017
111
115
Hehe, I do plan to add some filters in the future, just haven't gotten around to it yet :). The Voronoi pattern is looking super sexyyy.

Keep it up! I like the passion that you're bringing to the project.

I was sure about that since we can see a cutout for it around the edges.

Did you tried horizontal lines like in the front to Match the style? Black or red would look great.

or you can go metal mesh to give it a more agressive look.

Or you can go voronoi ?, that's how trend start !
 
  • Like
Reactions: Colinreay

Colinreay

Cable-Tie Ninja
Aug 28, 2016
198
490
I was sure about that since we can see a cutout for it around the edges.

Did you tried horizontal lines like in the front to Match the style? Black or red would look great.

or you can go metal mesh to give it a more agressive look.

Or you can go voronoi ?, that's how trend start !

All great suggestions! I do love the voronoi pattern.
 

_ONE_

SFF Lingo Aficionado
Original poster
Mar 1, 2017
111
115
4- Component selection: A baseline for our build


Boboom Tadam, here I am!
So after a sleepless night recovered from 13h to 20h, I felt like ?!
So I came uploading the next post to feel better!

All-right dear:

While sketching is fun, there’s something I like to do but don’t always recommend:
purchasing the components.

Why? Because thoses are some fixed variables: which might constrain you in the future to what you bought. Think about the fact that your idea might evolve but your hardware will not.

For example, what if you bought a full-length GPU but actually want a short case? Or A short GPU but in the end, as you’ll use An SFX PSU, you then have plenty of room for a longer one?

Therefore, I’ve done that 3x time for my builds, and I found it easier for newbies to start with actual component in their hand. It will allow them to touch their component, measure and understand their size, feel the space around them, and the best of it:
play at positioning them, And that's way faster than moving an object in CAD.

Just BE careful to not
drop and break them and BE careful of static electricity, as you might know: it can kill your component.

Also, going this way does often extend the time between the moment you buy your component and the moment you actually use them.
Almost a year has passed while my components where relaxing in a box. It might have been even longer if I didn’t knew how to use a CAD software, that said, I could have had them for cheaper if I purchased them more recently.


Another thing, They bring you something valuable: Motivation.


Anyway, If you are here, that mean you probably know enough about PC components.
We all agree that what unify us at SFF.net is that more a build is small, more it's cute! Even more if it's powerfull.

And as I’m building the smallest case possible, I’ll go with the smallest nevertheless most common components:

Obviously an ITX sized motherboard and Graphic Card,


from that I can safely pick my component:

(I did purchased all of them used, as I feel like the market is "overdosed" by us, consumer, please think about giving a chance to buy used component, and no: they will not burn out one month later)


What I had first was the MSI Z270i pro carbon AC with an i7-7700k, but those were the best component I already put on my main build (along an “used” 1080ti brand new I got for 260€!).


But this build was experimental and I....kinda didn’t want to fry my main build (+ that's an overpowered/kill cpu for it's choosen cooler/gaming)
(What's funny though is that at my first time powering on the Tiny Boy, It SMOKED!!! ? After weeks of work and hours of build, I Just felt deadly ? dead at this moment. but this story is for another chapter. it ended well ? )


Then I remembered that I also had an i7-6700k laying around! So I decided to buy an affordable motherboard for this build, which I did by purchasing for 75€ an Asus z170i Pro gaming on ebay.


For the cooler it’s (again...) the king of SFF: the Noctua NH-L9i !

I picked that one for it's height, which perfectly fit to my assembly solution (more on that in CAD chapters)

(Hey noctua, allow me to manufacture my prototype: The tiny cooler ? !)​

For those who want an old but relevant summary of the small cooler out there, confucius Confusis gave a nice graph:

Hooo: We are building a powerfull machine right? To play Apex right? So we need a freaking powerfull GPU!
Well, I already purchased one year ago an used but like new Gigabyte GTX 1070 ITX for around 200€ (that was a nice deal at this time).


Another nice link to look at, As it's a list of available ITX GPU on the market: https://graphicscardhub.com/best-small-form-factor-graphics-card/
It did was helpfull for me to check the usual lenght of an ITX GPU (generally less than 182mm)


For the drive now, I didn’t want to bother with 2.5” drive as:

  • I might not have enough place for them (even if at the end there might be a chance)
  • The wire are gonna be a challenge on this case, so let’s not add those ugly sata/HDD rail
  • nvme take way less place and are so much faster

So I waited for a deal on dealabs and took an NVME SSD: Crucial P1 2280 of 500gb for around 50€ (On Rakuten)


For the PSU, As I wanted this build to be the smallest possible, I decided to go with an external PSU solution
(wait until the next paragraph before complaining ? ).
I contacted the great Larry from HDPLEX, I Had an old revision of the card and he accepted to give me a discount to purchase the new one for my prototype , Then I sold the older one on ebay... everything is going well ?!

(This dude is nice by the way)

And Ho God... The quality of this card, it really feel German. Hope I'll match this in the future.

(Here's the next paragraph)

Yeah Okey I know… I know that many of you
don't like carying a power brick and instead want an SFX/flex PSU. That's legitimate and I can understand that. but remember that my goal was to make the smallest build I can, I really want to take the smallest volume possible on your desk, along with lowering as much as possible the case noise level. Now, don’t worry, I have a wonderfull news:

I do think that I’ll be more accessible to other if I make a case that support this alternative PSU solution…

Well guess what? I’m actually thinking of not one, not two…

But + 4x freaking more version of this case!

So stick with me to the end of this adventure to discover them:
You’ll learn how easy it is to go from one finalized design to another in no time, Hell Yeah!


Let's get back to our main goal, shall we?

- Making the smallest possible build -

While this was sticking in my head, I took plenty of time to twist my brain on playing Lego with my components & trying to figure out how to position them to get the smallest volume ever…

I found out that the sandwich layout was a great solution.

Yet nothing new here, but it's still something interesting as:

We now know from where to start !
(And this matter a lot)


All right so let’s sum up:

We now have our idea, our sketches, our components And an overall simple & defined layout.

While this can be fun for a moment, it start to be….somehow… too rudimentary.


This is where I recommend you to do something fairly simple:


- Start designing your project around it’s “Bare minimum skeleton” -
( yeah I’ve invented that one too ? )


But what is a "Bare minimum skeleton"?

Well the bad news here is that it's on the CAD designing chapter
The good news is that we are 3 chapter away from this one.

Humm... I actually don't know which one is the good or bad news, or if they are both good or bad...


But you'll find out more on that later!

Anyway, That's enough for today, hope you're having fun.

See you in few day for the chapter 5 - Before designing: Software - Fusion 360, will you marry me?

Ps: We are at 995 view of the thread as i'm writing this part, I'll click on it 5 time to reach the 1K views ?
PPS: It doesn't work from my account ?
 
Last edited:

_ONE_

SFF Lingo Aficionado
Original poster
Mar 1, 2017
111
115
It's awesome to see what you're doing here @_ONE_ in working on the design of the case. Having tried my hand at design and shelving the idea, there are some notes that may be of use to you. Have at the thread if you're interested: https://smallformfactor.net/forum/threads/rsc-really-small-case.914/

I just checked your thread!

You're like me!

Therefore you should open back your project, export your file and try giving a shot back at it using Fusion 360?

For prototyping it, I know a place where it cost 10x less, and you probably know which one.... Good for testing.

There's many usefull link in your thread, I'll implement them when I can. I've already put the picture of your drawing, using the perspective point technique, which I liked.
 
  • Like
Reactions: Soul_Est

_ONE_

SFF Lingo Aficionado
Original poster
Mar 1, 2017
111
115
5 - Before designing: Software - Fusion 360, will you marry me?


Allright, before desigining we need a software right?

I won’t write a lot on this part:
Aibohphobia already did it
here:, and just like him: I don’t recommend you to use sketchUp for modeling your case, it’s just not compatible at all with production standard workflow.

It might look easier, but trust me, you’ll regret it and you better learn a real CAD software... Which one then?


Well this is where
Fusion 360 join our adventure!


I’m not sponsored by them (but I wish ?) and actually I’m using their software as a student for free which…well… I was… at one moment of my life… I Guess?... We are all student of “life” isn’t it?


Autodesk F360 is definitely the one I recommend you to go with, I used it for so many projects, it’s definitely more accessible than solid works, It has a great learning curve, community forum that help each other, free for students, hobbyists, and startups, very beautiful + doesn’t look like a windows XP software. ?

One MAJOR tips:
DISABLE design history
As it gives you a lot of constraint through your operation, just remove it and you’ll be free to modify any part without having spaghetti timeline repercussion on your work (how
HERE)

For example: if you extrude a part from a shape, and delete this same shape, then all of what's made from it, like the part, will be deleted too… it was a nightmare to me, until I finally found out this solution.

It might be interesting back again when you’ll master the software, for example when designing with variable parameter (for example a same part with different sheet thickness),
here's some way to use it.


This part is kinda short, but I can’t make another course on how to use it, so I’ll do something way smarter than giving you a course on it:
I’ll give you some tutorial to go with:


those next tutorials have an older User interface, but don’t worry, you’ll find the option easily by searching for them:

More advanced:

So far so good, this part is short but it allow me to move quickly to the most interesting stuff!
Once you understand how to CAD design, we can then move to the next chapter:
5b- Before Designing: Resources - Gathering the online resources
 
Last edited:

Soul_Est

SFF Guru
SFFn Staff
Feb 12, 2016
1,532
1,926
I just checked your thread!

You're like me!

Therefore you should open back your project, export your file and try giving a shot back at it using Fusion 360?

For prototyping it, I know a place where it cost 10x less, and you probably know which one.... Good for testing.

There's many usefull link in your thread, I'll implement them when I can. I've already put the picture of your drawing, using the perspective point technique, which I liked.
Glad that could be of use to you.

As for re-opening the RSC project, I'll probably re-open it just to finish the design and get myself re-acquainted with FreeCAD. I've seen the project come quite a long way in the past two and a half years or more since I last used it. I prefer being OS-agnostic hence why I stick with software such as Blender, FreeCAD, GIMP, Inkscape, and Krita. I have found that Fusion360 can run on Linux via WINE and that there is a Lutris install script available so I'll try that when I next update my computer, Full Circle (https://smallformfactor.net/forum/threads/full-circle.5963/).
 
  • Like
Reactions: _ONE_

_ONE_

SFF Lingo Aficionado
Original poster
Mar 1, 2017
111
115
wait what material did you make this from and what did you use to make it

It's made of steel, and a laser cutting company did the cut and bend. I'm on the design part.
I'll explain my choice once we go through designing the case (2 chapter left!)
 
Last edited:

_ONE_

SFF Lingo Aficionado
Original poster
Mar 1, 2017
111
115
5B- Before Designing: Resources - Gathering the online resources


Hey! How are you? hope you’re fine!

This is the
last chapter before we finally go into designing, so keep up with me!

(Hey I’m thinking about making video that goes along this thread…but I’m kinda shy… so maybe with a voice over...)


All right,

We’ve learned many things in this
adventure, we had our idea, that turned into a concept. Our components and layout told us from where to start, and with our lovely software: We now have everything to start designing our case!... Right?

Not really… in this chapter,
many of us will fall exhausted and quit their adventure


Why? Because we're meeting our first enemy:

"Lord Loneliness"


Power n°1: “he makes you do everything from scratch”

Power n°2: “he makes you lose so much time you’ll not come back for more”


As far as I know, in my hand, there is:

  • An ITX motherboard
  • An ITX GPU
  • An HDPLEX
  • And few other components


So why not taking a caliper and start measuring them, because we want to create some accurate models of them right?


right? ...

You sure? …

Because …


DON’T FREAKIN MODELISE WHAT’S ALREADY ONLINE!!


I have a question for you:

How to spend a huge amount of time having no fun making something that will make you lose even more time after? ?

Answer:
Design your own components! ?


Allright let's make things clear: Please don’t start measuring your component to 3D modelize them….

If you do that, you either are:


  • Trying to create a model you didn’t found online and share it because you’re awesome…
  • Wanting to lose some time
Or 3- you found a 3d model online but it’s not free… LOL then I understand!

Or 4- It’s a very rare and specific component (like a
P-ITX!!!!!!) ?


Please hear me there, people always
lose so much time on that, therefore:


"While it can be good for learning how to 3D model, it actually isn’t to produce something."
We are here to design our case, not the n°1045744th GTX 1070 you own...


Out there, many fantastic 3D creators have perfected the job for you on so many object...


Screw, nuts, join, extruded profile, clips, mesh, standoff, rail, button, wire, cable, connector, chip…
There's everything!


Here’s a quick shot filtered by popular & computer category:


In the wonderful world of internet, there’s so many places where accurate (or not) 3D models of anything are waiting for you to download and use them.

Grabcad.com is definitely one of my favorites, for the other, I let you explore your own path (google search "free 3D (model) library”)


In my case, what I did worked but wasn’t optimal:

For the motherboard mounting hole:

I downloaded from grabcad.com every ITX motherboard I found, compared them and then figured out which one is completely out of precision, see if there’s common measure between them (especially for mounting hole and bracket), then remove every unnecessary component to finally get a pure version of the form factor.

Which in the end: is just a square with 4 holes… I did the same for the GPU dimensions.


If only I knew that someone already did a pixel perfect model where a motherboard and gpu have the perfect size…


Hummm.....Maybe like these?

(I wish I knew about them before) ?

Well I saw that after my build, but for you -> check this out:

resources


Therefore: While a reference model is good for standard compatibility, it’s also useful to merge it with a more complex model. One bring you accuracy while the other give you a real life preview


- The point here is to use what other have done before you. -


Answer this question:

Can you quantify the time you’ll not lose using resources like that?


Ok, now that this mistake has been pointed out, we can grab some model from grabcad (that name was nicely found tbh) to get ready for the next part.


For the motherboard,

any recent ITX model will do the trick, (avoiding weird standard like the
asus maximus formula)

Typing ITX motherboard will perfectly do the job, as you can see here:


I’ll go with this model (along the SFF resource to check conformity):


(Here's even a model where we have simple but effective area representation )


For the gpu, Look at what I found when I searched for “ITX Gigabyte”…


And that’s how you gain time!

(EDIT: This is really weird, I can't find this model again, and when writing this post, I'm sure that thousands of files are missing from grabcad, maybe a database update?)

Therefore, I found out that this model isn’t 100% right (aligning the pcie plug to the pcie slot was slightly off scale)

Again, from what I said, you should understand this:


"While a reference model is good for standard compatibility, it’s also useful to merge it with a more complex model. One brings you accuracy while the other brings you real-life preview"


And for the HDPLEX, a simple mail to Sir Larry will did the job to have the 3d model of it. Thank you Larry! (I like saying his name out lout)


You can obviously do the same for the RAM, the NVME etc etc… all the way up to the 24pin male PSU cable, absolutely everything is out there…except the noctua NH-L9i! (as surprising as it is, but we can work without it because all we need to know is its height)


Once you have all your files downloaded, you’ll often have to uncompress them in a folder to reveal the cad files, and import them in fusion 360 using simply this method:


The best format to use are .STEP and .IGES, their variant (.stp, .igs…) and other similar extensions. You might find some model in .SKP which stand for Sketchup
Hey Camon... Try importing them to fusion 360!
Go ahead It will work believe me!
but I bet you'll regret it as soon as you'll try to work with them.

Good luck, haha! (why
here)


Once your models are uploaded in your software, you can now explore them.
Our next step is to remove every unnecessary part on them, Why? Because:


- The Simpler your models are, the more fluid your experience will be. -

You have to be as minimalistic as possible when designing (in contrary to rendering). Also, be aware of crashes, those occurs often when there’s many components and details added to a CPU heavy workload (exemple: an operation like cutting through many parts, creating wide pattern etc etc).

And that’s why you should never start by designing a fine mesh ? (please don’t try)


Let’s take the example of this motherboard:


What we can remove is every SMD on the PCB:
Resistor, conductance, capacitor, chip, VRM modules etc etc…


What we want to keep though Is:

Ram slots,pcie slot, M.2/Nvme Slot, Sata, Some IO, connector (usb 3.0, audio etc etc), The cpu bracket and the Power connector (24pin and CPU).

And the final result is this:


You can go even further by removing every hole (in the Pcie & Ram slot), joining what’s together etc etc...

- The goal is to get minimalitics bodies with the simpliest shapes. -


When you’ll be done with your components, and have them ready to be used in your design, we can then move on !

Next Chapter: 6 – Designing: Starting point: The MBS aka “Bare minimum Skeleton” (keep updated)


There might be a moment before the next update, because I Need to figure out many things. so let's just talk until then :)
I'll often come back to answer your question, and put some order in my "Freestyle writing"​
 
Last edited:

Phreno

Trash Compacter
May 24, 2020
38
30
Finally! i'm glad to see some parametric design applied to a case., it definitely extend the variety on the market,

I assume you use grasshopper or similar to achieve this result. I would like to suggest you some design changes: try to improve the voronoi by reducing the minimum distance between the cell (how is now?i would go to 3/4mm), so you can raise the amount of random point to reach a more organic feel on the surface area. it could potentially increase the transparency for better airflow.
 
  • Like
Reactions: _ONE_

_ONE_

SFF Lingo Aficionado
Original poster
Mar 1, 2017
111
115
Finally! i'm glad to see some parametric design applied to a case., it definitely extend the variety on the market,

I assume you use grasshopper or similar to achieve this result. I would like to suggest you some design changes: try to improve the voronoi by reducing the minimum distance between the cell (how is now?i would go to 3/4mm), so you can raise the amount of random point to reach a more organic feel on the surface area. it could potentially increase the transparency for better airflow.

Glad to see you there from reddit!

The voronoi pattern has litterally be made by moving many "long stick" in the cad software and merging them... It took me days to perfect it.
That's why this is more like a "straight" voroni than a natural one (with more curve)
it's a simple solution though.

I'm really impressed by grasshopper, I don't know it but I'll definitely give it a shot (I used a voronoi plugin in f360 but i wasn't pleased with the result).

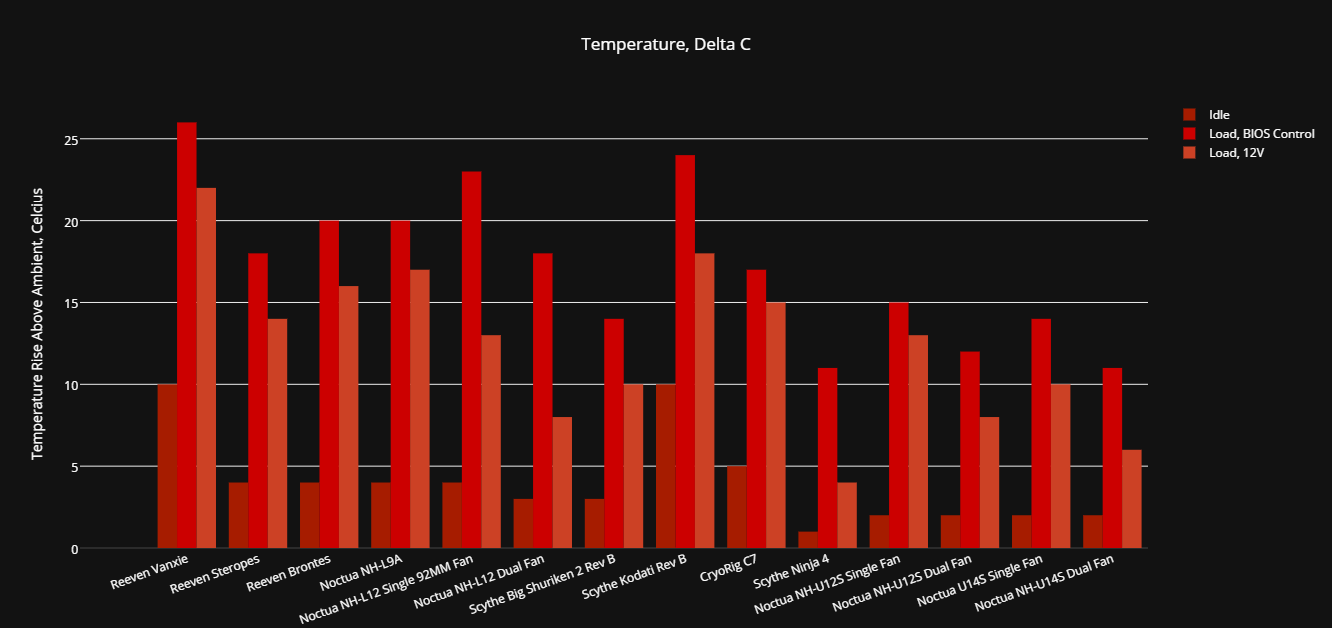
the case is achieving almost 2/3 of free area ratio with this size.

for reducing the size, I will jump on that the moment I meet law regulation (CE for example)

Maybe that they don't allow finger to tickle fans and Pcb ?

I have some big idea, like for example leaving a hole, and making some thin part that you screw on top, with different pattern for full customisation.
It'll also allow you to put a filter between the pattern and the hole area.

but it'll be easier to show once we're in it. I would loooove to create poll to select the best looking for the community.

keep it up!
 
  • Like
Reactions: Soul_Est

_ONE_

SFF Lingo Aficionado
Original poster
Mar 1, 2017
111
115
Wow. An awful lot to cover here.

You couldn't ask for a better community to lean on for help. Good luck!
Thank you!

I'm finalizing the next chapter, I'll upload it within hours.
 
Last edited:

_ONE_

SFF Lingo Aficionado
Original poster
Mar 1, 2017
111
115
Wait, I uploaded it, but it's very very long, How Can I move it to the 3rd page? Or do I need people to post? Can you help me with that?

I already have part 4, 5 & 5B here, It's way too long to post it now, so I'll wait for page 3
 
Last edited:

_ONE_

SFF Lingo Aficionado
Original poster
Mar 1, 2017
111
115
(this comment is meaningfull, its only goal is to get me to page 3, so that page 2 will breath a little)
ps: you should not read this, move to page 3 pls
 
Last edited:
  • Like
Reactions: ParallaxStax