
This review has been written by forum member IntoxicatedPuma, and reflects their views, not necessarily those of SmallFormFactor.net. Only minor edits for readability have been made.
The next case from The China Desk is also from a Taobao seller with their own unique design. This seller only has one case however, and that is the “Black Angel.” When I purchased it from them for 499 RMB + shipping (no power supply included this time) – they informed me that multiple colors were available – I chose a black frame and “smoke” acrylic exterior. However a silver frame and/or clear exterior was also available.
[mks_separator style=”blank” height=”2″]
Before purchasing this case, I noticed that the design is similar to another boutique seller on Taobao – Sunmilo Studios. The difference is Sunmilo focuses on CNC’d aluminum shells while the Hauteware has an all Acrylic exterior. Beneath the shell however, the two companies have very similar structure which I will explain in more detail later. The Hauteware Black Angel could theoretically be made quite easily by an ambitious DIYer if they have access to the right supplies and tooling.
![[IMG]](http://robspctech.com/media/tcd/TCD/Hauteware_BlackAngel/edit/_1150024.jpeg)
Without further delay, lets get to unboxing this case!
[mks_separator style=”blank” height=”2″]
Unboxing
The case came nicely boxed – which is to say it was a box inside another box. Sufficient wrapping was provided to protect the case through almost any kind of transit you could think of. The interior “product box” was labelled with the company name and logo, but not much other detail. Inside was the case. Covered in a fabric bag, inside which was the case wrapped in bubble wrap- and just to be safe, also enclosed in cling wrap around single piece shell to keep dust and other things from scratching or damaging it. Needless to say, it left a good impression. Oh, they also included a pair of white gloves to keep dirty people like me from leaving their fingerprints all over the case. How considerate.
[mks_separator style=”blank” height=”2″]
![[IMG]](http://robspctech.com/media/tcd/TCD/Hauteware_BlackAngel/edit/_1150026.jpeg)
[mks_separator style=”blank” height=”2″] ![[IMG]](http://robspctech.com/media/tcd/TCD/Hauteware_BlackAngel/edit/_1150027.jpeg)
[mks_separator style=”blank” height=”2″] ![[IMG]](http://robspctech.com/media/tcd/TCD/Hauteware_BlackAngel/edit/_1150028.jpeg)
At this point, I am sorry to report, things started to go downhill. Having built in a Sunmilo case as well as having a test bench based on a qDIY system – both of which use the same rail system as this Hauteware case – I was expecting to have some difficulty with building in this case. Some things which should have been trivial were made more difficult by the designers use of different screws. You will need no less than 4 different types of screwdriver bits to assemble this build. A large hex, a small hex, a typical Philips head, and one small star bit screw. I apologize, I didn’t write down which sizes specifically, but if you are interested in buying this case I can certainly provide the information.
[mks_separator style=”blank” height=”2″]
![[IMG]](http://robspctech.com/media/tcd/TCD/Hauteware_BlackAngel/edit/_1150037.jpeg)
[mks_separator style=”blank” height=”2″] ![[IMG]](http://robspctech.com/media/tcd/TCD/Hauteware_BlackAngel/edit/_1150075.jpeg)
Removing the outer shell is not too difficult though, and unless you plan on accessing the internals on a regular basis, the time to open and move things around should not be a turn off – but I’d suggest this is not a case for those which like to tinker with their PC’s. You should build it right the first time and leave it as is. To complete this task, simply remove the 4 screws with a large hex bit on the top and bottom to remove the top panel covering the IO and the bottom fan mount. The top panel also holds the power button and cable, so be careful when removing it. Unfortunately my power cable came with an end that was not shrinkwrapped properly so the braiding frayed a bit and looks a bit ugly.
[mks_separator style=”blank” height=”2″]
![[IMG]](http://robspctech.com/media/tcd/TCD/Hauteware_BlackAngel/edit/_1150080.jpeg)
With the top and bottom removed, you will find 4 small star bit screws which need to be removed in order to slide the outer shell off the frame. These 4 screws are attached to wing nuts which secure the shell to the frame by locking in the rails. At first it might seem like these are not totally secure, but in practice I have found them to be quite secure and snug. They are not my favorite to deal with, and they need to be re-attached carefully when re-assembling the case. The wing nuts are also easy to lose, so it’s important to be careful when tearing down the case.
[mks_separator style=”blank” height=”2″]
![[IMG]](http://robspctech.com/media/tcd/TCD/Hauteware_BlackAngel/edit/_1150082.jpeg)
Once the shell has been slid off, the case is open and all the areas are easy to access. The fans can be mounted on the bottom acrylic piece which was first removed, and the motherboard can be added. This part also gets a slight bit tricky because of the design of this case. Like the outer shell, the motherboard stand-offs also attach in a similar fashion. Rails run under the board which the stand-offs are secured to by screwing them into a wing nut which grips onto the rail. When I first tried to assemble the test PC, I found they did not line up quite right and I could not screw the motherboard down to all 4. I used a pair of pliers to unscrew the standoffs and move them to the correct place, however the top rail did not line up quite perfect and the motherboard was still very difficult to screw down. It ended up being a two man operation, with a coworker screwing the board down while I held it in place with a very substantial amount of force.
[mks_separator style=”blank” height=”2″]
![[IMG]](http://robspctech.com/media/tcd/TCD/Hauteware_BlackAngel/edit/_1150103.jpeg)
Next came the installation of the PCI graphics card. This also was a little bit more complicated than usual. The design has a small piece of acrylic which is screwed down and is supposed to secure the card in place, as there are no screw holes to fasten the card’s I/O plate to the chassis. Unfortunately I don’t find this particularly good at the job, and it also uses two different kinds of screws to mount to the chassis.
[mks_separator style=”blank” height=”2″]
![[IMG]](http://robspctech.com/media/tcd/TCD/Hauteware_BlackAngel/edit/_1150089.jpeg)
The case can support up to at least 170mm GPU with the two 120mm fans installed, but one fan could be removed and give an extra 20mm or so in room. If the PCI power plugs in from the back you may have very little room to spare. Width and Height wise, this case should handle most any card that has abnormal dimensions.
[mks_separator style=”blank” height=”2″]
![[IMG]](http://robspctech.com/media/tcd/TCD/Hauteware_BlackAngel/edit/_1150088.jpeg)
Two additional hard drives are provided for by using the wingnut and a rail system. However more of these mounts can be purchased from Hauteware, so in theory you could attach as many hard drives as you have rail space for. I would estimate 6 or 7 is probably possible, however you’d probably ruin the aesthetics of your case (unless you have some awesome looking SSD’s). This is a big advantage of this rail system, and you could even use the Sunmilo 4x SSD cage mounted in this if you wanted.
[mks_separator style=”blank” height=”2″]
![[IMG]](http://robspctech.com/media/tcd/TCD/Hauteware_BlackAngel/edit/_1150105.jpeg)
Finally it’s time to install the power supply. This was a little bit tricky to install in that it took some careful positioning and wedging to get in just right, as the case is just barely wide enough for the SFX power supply (SFX-L power supplies should have plenty of room to fit). The power supply only screws into the top panel with 4 screws, leaving the two outermost mounting holes left open. The fan should be placed facing the motherboard, otherwise it will be suffocated by the exterior shell. Screws for the power supply were not included, and unfortunately it cannot use the standard PSU screws, it needs special ones with extra length to pass through the acrylic.
[mks_separator style=”blank” height=”2″]
![[IMG]](http://robspctech.com/media/tcd/TCD/Hauteware_BlackAngel/edit/_1150091.jpeg)
[mks_separator style=”blank” height=”2″] ![[IMG]](http://robspctech.com/media/tcd/TCD/Hauteware_BlackAngel/edit/_1150095.jpeg)
With this in place, it’s time to re-assemble the case. First I chose to mount the bottom plate with fans to the case, and attach the case fans. Fans are not included with this case and neither are the fan screws, which may also need extra long ones to pass the acrylic and attach securely to the fans.
[mks_separator style=”blank” height=”2″]
![[IMG]](http://robspctech.com/media/tcd/TCD/Hauteware_BlackAngel/edit/_1150107.jpeg)
Second, I attached the power cable from the top panel, but did not secure the top panel yet to the case. I turned it instead so that I can slide the shell down over the case, careful not to snag any cables. This part is a little bit tricky because A) the wing nuts need to be re-attached first and carefully guided onto the rails and B) the case will just slide to any position, so you need to gently moved it to the correct position to give airflow to the bottom fans. Once in place, you can screw down the wing nuts and secure the shell on the chassis. You might be thinking it’s time to screw in the top panel, but you’d be wrong. Next you need to attach all of your cables to the rear I/O – because once you screw in the top panel you can’t access them. All cables must fit through a stretched hexagon shaped hole measuring just 3cm by 7cm. If you have a lot of cables, then best of luck to you. Also, the clearance from the I/O to the top panel is not particularly great (maybe slightly less than an FT03 Mini) so try to avoid cable clutter. Once you have your cables plugged in, then you may screw down the top plate.
[mks_separator style=”blank” height=”2″]
![[IMG]](http://robspctech.com/media/tcd/TCD/Hauteware_BlackAngel/edit/_1150108.jpeg)
With the case fully assembled, you can stand back and admire your work. And wow, it is quite a beauty. If you like RGB LED’s on your motherboard and RAM, and maybe your CPU cooler and fans and GPU, you are going to absolutely love this case. Cable management is not so great so some custom cables might help a bit, but otherwise this case will certainly stand out and makes the struggle to build it worth the effort.
Apologies for the final pictures, I will try again with a polarizing filter to see if I can remove some of the reflection and glare from the pictures.
[mks_separator style=”blank” height=”2″]
![[IMG]](http://robspctech.com/media/tcd/TCD/Hauteware_BlackAngel/edit/_1150119.jpeg)
Skin deep looks might not sway you if you are a practical kind of person. So how does the case perform? Quite well I am pleased to report. As you can imagine, with such a small size, the two 120mm fans can easily provide enough airflow to cool the components. The inside continues with the typical TCD test build:
[mks_separator style=”blank” height=”2″]
Testing
Silverstone ST45SF-G power supply
Gigabyte B85N-Phoenix motherboard (with Orange LEDs!)
Intel Pentium G3258 CPU (1.085v @ 3.2 ghz & 1.254v @ 4.2 ghz)
Crucial Ballistix Tactical Tracer 2x4gb DDR3 1866mhz (with Orange LEDs!)
Scythe S950M low profile CPU cooler
Gigabyte Geforce 210 passive cooling GPU
2x Thermaltake Riing 120mm fans (with Orange LEDs!)
or 2x Noctua 3000rpm 120mm fans (Industrial series, no Orange LEDs L)
Kingston mSATA 60gb SSD
[mks_separator style=”blank” height=”2″]
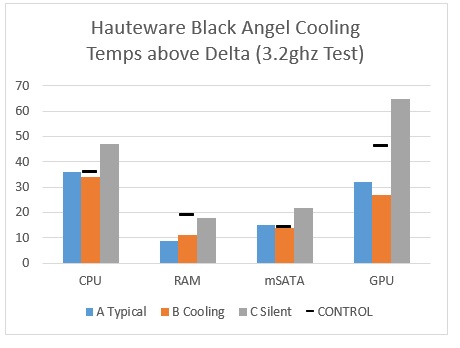
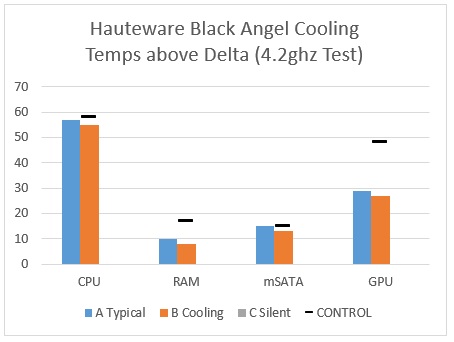
I tested in 3 configurations, plus a Control version which was done outside the case. Each configuration varied in cooling, from a silent build with no fans, a typical build with medium speed fans, and a max cooling build with high speed fans and fan profile. Each configuration was also tested at both 3.2ghz and 4.2ghz CPU clock speed. The test was a 15 minute long torture test, consisting of Prime 95, Crystal Mark benchmark, and Furmark being run during this time.
The chassis performed well in all but the silent build, where the GPU and CPU both heated excessively due to poor airflow.
[mks_separator style=”blank” height=”2″]
[mks_separator style=”blank” height=”2″]
Since the case can support larger coolers up to 130mm, this should no doubt be enough for some typical overclocking provided a good cooler is used. Even with the low profile cooler used in this test, the case was able to match the Control test CPU temperatures and best it’s RAM and GPU (passive GPU used) temps.
[mks_separator style=”blank” height=”2″]
Conclusion
In closing, if small size and good looks are your desire, this case is definitely one for consideration. It’s not the easiest to work with but far from impossible. Patience and a thought out build will reward you with a stunning looking finished product that you can be proud of for a long time. It is quite unfortunate that the proper tooling needed for assembly was not provided, and a better GPU mounting design is needed as well. Aside from these disappointing oversights, this case offers great cooling and great looks at a good price.
[mks_separator style=”blank” height=”2″]
Thoughts? Join the ongoing discussion here.