It’s been a few months since there’s been a new mini-ITX motherboard to review. We had just gotten a taste of what Sandy Bridge motherboards had to offer mini-ITX gaming when the supply suddenly dried up. The wait is over. The first of the new mini-ITX boards is now available in the form of an ASRock H67M-ITX and I’ve picked one up for a review. It won’t be the only choice for long. By the time you read this article, most of the other mini-ITX 1155 motherboards will be available.
The ASRock offering does have one unique feature that sets it off from the competition. It’s offered in two configurations. The first offers built-in WiFi and is labelled as the H67M-ITX/HT. The second configuration, known simply as the H67M-ITX (no /HT), shares the same features as the HT, but without the wireless support. The H67M-ITX will also cost you about $40 less than its WiFi touting brother, which retails for about $140. Skip the wireless and you can grab the H67M-ITX for less than $100.
Unboxing:
ASRock wants to make sure you know that the previous issue with the H67 chipset has been fixed. There is not much clutter on the front of the box, but the few stickers that are there pop out, especially the one that says “New B3 Stepping Chipset Adopted” and “SATA problem fixed”.
The back of the box offers a general overview of the board layout. A large portion of the remaining real estate on the backside of the package is taken up by a description of ASRock’s XFast USB technology, which according to the box, is “Faster Than Your Imagination” (We’ll need to see some third party testing to back up that claim).
Although the box itself was larger than most mini-ITX cartons, the H67M-ITX was well secured in its own compartment. The added space in the display box was filled with a driver disk, three user manuals, two SATA cables (one is labelled as being optimized for SATA III), an I/O back plate and a pair of 3D glasses.
Yep, 3D glasses. Just like the ones you find in the cereal box. The only difference is these are made of plastic, instead of cardboard, and are decorated with the ASRock logo. ASRock has even included a copy of their ‘ASRock 3D Classroom’ brochure, a small printout that contains some basic information on the why and how of 3D viewing.
First Impressions:
At first glance, the H67M-ITX seems well laid out and not too cluttered, but it’s clear that most of the empty space would be filled up by the optional mini-PCIe wireless adapter and antennas on the H67M-ITX/HT. The rest of the board is occupied with the standard array of ports and slots. There is a bit of dressing on the H67 chip. The blue heatsink is covered by a charcoal plate bearing the ASRock logo in white lettering and a cut-out “A” which reveals the blue of the heatsink below. It’s nothing fancy, but adds a bit of character to the board.
There are two full-size memory slots supporting up to 16 GB of DDR3-1333. The PCI Express 2.0 x16 slot occupies its standard spot and the opposite side of the board is home to the 24-pin power connector, two SATA II ports, two SATA III ports, two USB headers as well as front panel and fan connectors.
The rear panel offers all of the necessary connectivity options including four USB 2.0 ports, two USB 3.0 ports, eSATA and PS/2. The standard array of audio ports is provided with five speaker outlets and an optical SPDIF. Display output is covered by VGA, DVI and HDMI. Network connectivity is handled by a single Gigabit LAN port.
Installation:
The first thing I noticed when starting the install was that the CPU socket is about 5mm closer to the PCIe slot than on the Intel DH67CF. The DH67CF actually has board headers beside the PCIe slot that are next to impossible to access once a video card is installed, but offers 54mm from the center of the socket to the edge of the PCIe slot. The H67M-ITX however, moves those headers to other spots and positions the socket center 49mm from the PCIe slot. There is less than 4mm clearance between the stock cooler and the video card but it gives you easier access to the headers, especially the CPU fan and SPDIF outputs.
If your planning on installing the H67M-ITX in (or rather on) a Lian Li PC-Q06 test bench, as I am, be aware that you’ll need to remove the L-bracket that helps secure the video card support in order to get the board to line up with the standoffs. With the L-bracket in place, the audio outputs will bump into it, preventing the board from sitting properly. This won’t be an issue with other cases that use a standard I/O backplate.
Other than that, the rest of the install was straight forward. All of the necessary headers are easy to get to, unlike the DH67CF where they’re tucked up tight against expansion and memory slots.
The H67M-ITX is the first board I’ve used that forgoes the traditional BIOS in favour of the newer Unified Extensible Firmware Interface (UEFI). Without getting too deep into the features of UEFI, the graphical interface is a nice change and the ability to boot for disks larger than 2 terabytes might a useful feature for some users. UEFI also claims faster boot times, and although I didn’t time it, it does seem to POST very quickly.
A quick look through the UEFI menus quickly shows that overclocking features are virtually nonexistent on the H67M-ITX. Not that I was expecting any different. There’s the usually adjustments to the turbo boost frequency and descent latitude for adjusting memory speed and voltage, but that’s about it. ASRock does include a short manual with the H67M-ITX that offers a good introduction to the rest of the features of the UEFI and descriptions of each function.
After a quick install of Windows 7 Home Premium 64-bit I popped in the ASRock driver disk and clicked the ’Install All’ button. Although this is something I don’t normally do on my own systems, I was curious to see how much hidden software was installed. The menu below ‘Install All’ lists the individual drivers available to install, but by taking the shortcut, you’re also unknowingly installing a 60-day trial of Norton Internet Security, four Zynga shortcuts (that I could find), something called SmartView (a sort of start page/portal for IE), Acrobat Reader and the ASRock H67M-ITX user manual. Unless you have a need for the excess software, install the drivers you need individually.
Benchmarks:
I’m didn’t get too carried away with the benchmarks for this review as I just wanted to see if there was much difference between the H67M-ITX and my previous DH67CF.
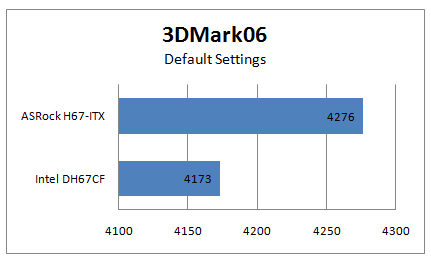
A run through the 3DMark06 suite shows that the ASRock H67M-ITX puts up slightly better numbers than the Intel DH67CF, even though both are using the same Core i5-2500k processor, but the increase is only 2.5%. Of course, that’s a bigger spread than I expected, considering the GPU is exactly the same for both motherboards.
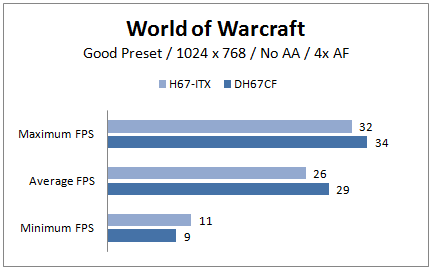
Loading up World of Warcraft and taking a tour around Orgrimmar shows a different story for the H67M-ITX. It lags behind the DH67CF on both maximum (5.8%) and average (10.3%) frames per second. It does hold up the low end though, posting an 18.1% improvement on the minimum framerate.
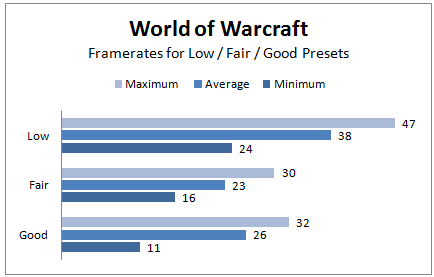
Adjusting the video quality settings gives playable framerates for World of Warcraft, but you’ll need to skip right past the ‘Fair’ preset and drop down to ‘Low’. The H67M-ITX puts up lower numbers for the ‘Fair’ preset than it does for ‘Good’. I find both settings playable, but if you want to stay above 30fps (considered to be the minimum playable framerate by most) you’ll have to be content with ‘Low’ settings.
Power Consumption and Temperatures:
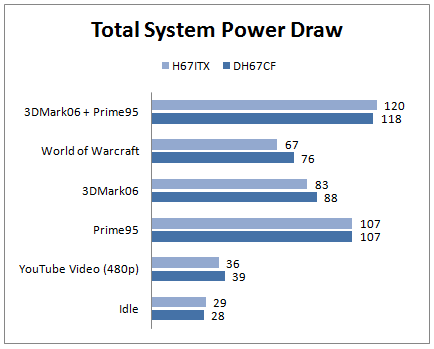
Power consumption is a mixed bag for the H67M-ITX when it’s compared to the DH67CF. Although the actual differences are negligible, the H67M-ITX uses less power during World of Warcraft, 3DMark06 and YouTube. It drew more power while grinding out Prime95 simultaneously with 3DMark06 and pulled an extra watt while idle. The power use during the Prime95 stress test was identical to that of the DH67CF.
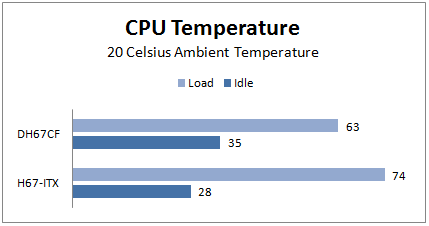
The temperature range of the H67M-ITX is a fair bit wider than the DH67CF. On the low end it stays at a relatively cool 29 degrees. When heated up with Prime95 it quickly surpasses the 63 degrees I saw with the Intel board and peaks out at 74 degrees. While still well below the 98 degree TJ max, the i5-2500k does run much hotter in the H67M-ITX. Ambient temperature for this test was 19.5 degrees Celsius.
Conclusions:
Considering the price point of the H67M-ITX ($99 on NewEgg at the time of this review) it’s a good choice for a mini-ITX gaming build. It does run a bit hotter than the Intel DH67CF. Give that some consideration if your installing the ASRock board into a tight enclosure.
I like: Sub $100 price and available with WiFi for an extra $40.
I don’t like: The CPU runs a bit warm and is situated very close to the PCIe slot.
Final thought: A good choice if you’re on a budget.

